
WARNING: Following these instructions you could damage your CNC machine or your controller. All and any damage is YOUR explicit responsibility. These instructions are given in good-faith, based on equipment status, compute resources and facilities available to me. They have worked and this is a description of how. This DOES NOT WORK WITH WINDOWS VISTA but the procedure should be similar.
The Network
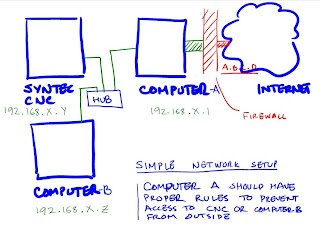
We need to first decide what our network really looks like. For simplicity, lets assume that your computer is called "SuperComputer" and your CNC machine is called "SuperCNC". The IP address (We'll get to that in a short while), for your SuperCNC is 192.168.100.21 and the IP address of your SuperComputer is 192.168.100.20. You also have another computer called "NetComputer" that is connected to the Internet and has an IP address 192.168.100.1
Furthermore lets assume that all your computers are on Workgroup SUPERGUY and Domain SUPERGUY.
The current situation you have is the following. The SuperComputer connects to the NetComputer to have Internet access. The SuperCNC is still on its own.
Safeguard your Current Setup
Now you need to make a backup of both your CF Cards from the Syntec, so that if something goes wrong you can get back to your original setup.
Now, you need to load the System CF Card and see the root directory, there you'll find a file called, CNCNET.BAT, you need to edit only the last line. In our case since our computer with NC files is called SuperComputer, we change the last line as shown below. Save and close the file.
FILE CNCNET.BAT:
----------------------file start--------------------------------
C:\NET\net initialize
@path=%PATH%;C:\NET;
@C:\NET\netbind.com
@C:\NET\umb.com
@C:\NET\tcptsr.exe
@C:\NET\tinyrfc.exe
@C:\NET\nmtsr.exe
@C:\NET\emsbfr.exe
@del C:\NET\connect.dat
@C:\NET\net start
@C:\NET\net use n: \\SUPERCOMPUTER\SUPERMILL
-------------------file end-----------------------
Now, you need to go to the directory on the System CF Card called NET, In this directory there are two files, one is called HOSTS, you need to add the three lines shown below in this file.
FILE \NET\HOSTS:
----------------------file start--------------------------------
# Copyright (c) 1994 Microsoft Corp.
#
# This is a sample HOSTS file used by Microsoft TCP/IP
#
# This file contains the mappings of IP addresses to hostnames. Each
# entry should be kept on an individual line. The IP address should
# be placed in the first column followed by the corresponding IP name.
# The IP address and the host name should be separated by at least one
# space.
#
# Additionally, comments (such as these) may be inserted on individual
# lines or following the machine name denoted by a '#' symbol.
#
# For example:
#
# 102.54.94.97 rhino.microsoft.com # source server
# 38.25.63.10 x.microsoft.com # x client host
127.0.0.1 localhost
192.168.100.21 SUPERCNC
192.168.100.1 NETCOMPUTER
192.168.100.20 SUPERCOMPUTER
-------------------file end-----------------------
Now you need to edit the file called LMHOSTS in the NET directory of System CF Card. You need to add the exact same three lines from the HOSTS file above here.
FILE \NET\LMHOSTS :
----------------------file start--------------------------------
# Copyright (c) 1994 Microsoft Corp.
#
# This is a sample LMHOSTS file used by Microsoft TCP/IP
#
# This file contains the mappings of IP addresses to computer
# (NetBIOS) names. Each entry should be kept on an individual line.
# The IP address should be placed in the first column followed by the
# corresponding computername. The address and the LAN Manager name
# should be separated by at least one space.
#
# Note that the utilities will only recognize a finite number of
# mappings. This current limit is 59 for Windows for Workgroups.
#
# Also, comments (like these) may be inserted on individual lines or
# following the machine name denoted by a '#' symbol.
#
# For example:
#
# 149.124.10.4 server1 # main office server
# 182.102.93.122 joe3 # joe's database server
192.168.100.21 SUPERCNC
192.168.100.1 NETCOMPUTER
192.168.100.20 SUPERCOMPUTER
-------------------file end-----------------------
Now you need to edit the file called NETWORKS in the NET directory of your System CF Card. by adding the name of the local domain as network name of your computer.
FILE \NET\NETWORKS :
----------------------file start--------------------------------
# Copyright (c) 1994 Microsoft Corp.
#
# This file contains network name/network number mappings for
# local networks. Network numbers are recognized in dotted decimal form.
#
# Format:
#
# [aliases...] [#]
#
# For example:
#
# loopback 127
# campus 284.122.107
# london 284.122.108
loopback 127
SUPERGUY 192.168.100
-------------------file end-----------------------
The last and most important file is in the NET directory of the System CF card its called SYSTEM.INI
You need to edit to as follows. You need to edit only the first section of SYSTEM.INI which is labeled as [network], and only those entries that you see in bold blue.
FILE \NET\SYSTEM.INI
----------------------Part to Edit--------------------------------
[network]
filesharing =no
printsharing =no
autologon =yes
computername =SUPERCNC
lanroot =C:\NET
username =CNC
workgroup =SUPERGUY
reconnect =yes
dospophotkey =N
lmlogon =0
logondomain =SUPERGUY
preferredredir =basic
autostart =basic
maxconnections =8
-------------------Stop Edits-----------------------
Now you have the CF card all setup. We need to focus attention on your computer the "SUPERCOMPUTER".
You need to open a directory that SUPERCNC would be able to read from your SUPERCOMPUTER. Thus in the SUPERCOMPUTER right click -> NEW Folder -> SUPERMILL. Once SUPERMILL is created, right click the folder -> Share folder, accept the defaults, make sure that everyone can read the folder SUPERMILL and can also edit the files.
Connect your SUPERCNC to the SUPERCOMPUTER, boot both, and go to file, network load, and you'll see the files that you place in the SUPERMILL directory on your Syntec controller.


No comments:
Post a Comment